REST 컨트롤러 작성하기#
서버에서 데이터 가져오기#
@CrossOrigin(origins = ["*"])
@RequestMapping(path = ["/design"], produces = ["application/json"])
@RestController
class DesignTacoController(
   private val tacoRepository: TacoRepository
) {

   @GetMapping("/recent")
   fun recentTacos(): Iterable<Taco> {
      val pageRequest = PageRequest.of(0, 12, Sort.by("createdAt").descending())
      return tacoRepository.findAll(pageRequest).content
   }
}
@RestController: @Controller와 @ResponseBody를 지원하는 애노테이션@ResponseBody: 리턴 값을 HTTP 응답 바디에 직접 쓰는 값으로 사용한다.- 응답 바디를 직접 작성하는 방법으로는 이외에도,
ResopnsEntity 객체를 반환하는 방법이 있다.
@RequestMappingproduces: HTTP의 Accept 헤더에 사용되고 HTTP의 Content Negotiation에 사용된다.consumes: HTTP의 Content-Type 헤더에 사용된다. 요청을 보낼 때 보내느 헤더가 일치해야된다.
@CrossOrigin: CORS 적용.
@GetMapping("/{id}")
fun tacoById(@PathVariable("id") id: Long): ResponseEntity<Taco> {
   val taco = tacoRepository.findById(id)
   if (taco.isPresent) {
      return ResponseEntity(taco.get(), HttpStatus.OK)
   }
   return ResponseEntity(HttpStatus.NOT_FOUND)
}
서버에 데이터 전송하기#
@HttpStatus: 응답 코드로 보낼 값을 선언할 수 있다.
@PostMapping(consumes = ["application/json"])
@ResponseStatus(HttpStatus.CREATED)
fun postTaco(@RequestBody taco: Taco): Taco {
   return tacoRepository.save(taco)
}
서버의 데이터 변경하기#
- 데이터를 변경하기 위한 HTTP 베서드로는 PUT과 PATCH가 있다.
- PUT: 데이터 전체를 교체
- PATCH: 데이터의 일부분을 변경하는 것
서버에서 데이터 삭제하기#
CrudRepository의 deleteById() 호출 시 존재하지 않는다면 EmptyResultDataAccessException 예외가 발생한다.
하이퍼미디어 사용하기#
- 참고 자료
- HATEOAS(Hypermedia As The Engine of Application State): REST API를 구현하는 방법 중 하나로, API로부터 반환되는 리소스에 해당 리소스와 관련된 하이퍼링크들이 포함된다.
- REST 서비스의 클라이언트가 서버와의 결합도를 낮추기 위해서 사용한다.
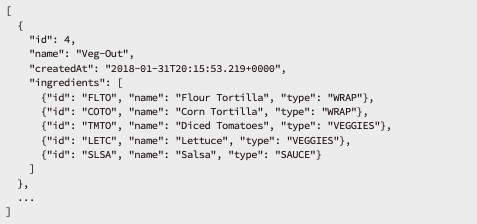
- HATEOAS 사용 전에는 각 API의 url을 하드 코딩으로 가지고 있고, 호출하는 구조였다.
- HATEOAS 적용 전의 REST API 모습
- HATEOAS 적용한 REST API 모습
- 각 리소스의
_links라는 속성에 하이퍼링크를 포함시킨다. self에 리소스 자신을 참조하는 링크를 가진다.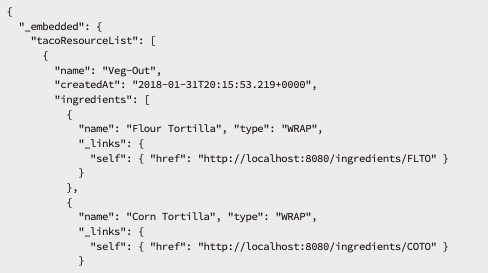
- 의존성 추가
<dependency>
    <groupId>org.springframework.boot</groupId>
    <artifactId>spring-boot-starter-hateoas</artifactId>
</dependency>
하이퍼링크 추가하기#
1. 리소스에 하이퍼미디어 지원 추가#
- 응답으로 줄 리소스에
RepresentationModel이라는 클래스를 상속한다.add()메서드가 상속되고 해당 메서드를 통해서 링크를 추가할 수 있다.
@Entity
class Taco(
   @Id
   @GeneratedValue(strategy = GenerationType.IDENTITY)
   var id: Long? = null,
   var createdAt: Date? = null,

   @Size(min = 5, message = "Name must be at least 5 characters long")
   @NotNull
   val name: String? = null,

   @ManyToMany(targetEntity = Ingredient::class)
   @Size(min = 1, message = "You must choose at least 1 ingredient")
   @NotNull
   val ingredients: List<Ingredient>? = null
): RepresentationModel<Taco>() {
   @PrePersist
   fun createdAt() {
      createdAt = Date()
   }
}
2. 링크 만들기#
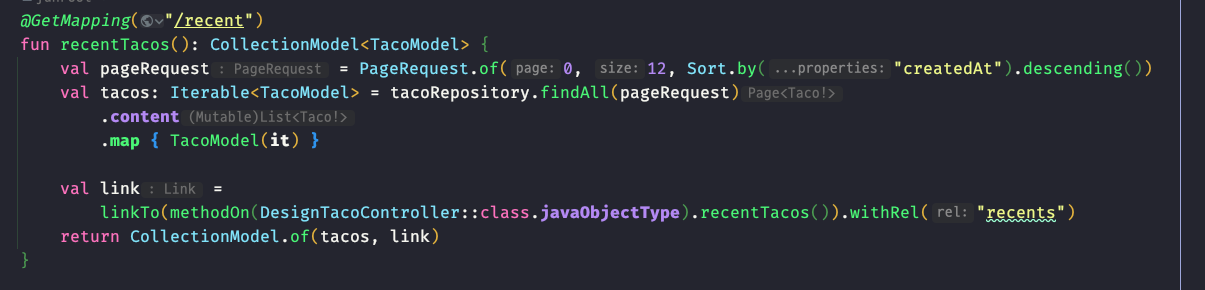
WebMvcLinkBuilder를 통해서 링크를 하드코딩하지 않고, 링크를 추가할 수 있다.linkTo(): 컨트롤러 클래스인지 검사하고 컨르롤러에 매핑된 url을 얻는다.methodOn(): 컨트롤러에서 대상 메서드에 매핑된 url을 얻는다.withSelfRel(): self 링크에 추가한다.
@GetMapping("/recent")
fun recentTacos(): CollectionModel<Taco> {
   val pageRequest = PageRequest.of(0, 12, Sort.by("createdAt").descending())
   val tacos = tacoRepository.findAll(pageRequest).content

   val link =
      linkTo<CollectionModel<Taco>> { methodOn(DesignTacoController::class.java).recentTacos() }.withSelfRel()
   return CollectionModel.of(tacos, link)
}
3. Representation model assmbler#
- 각 엔티티에 대한 매핑을 자동으로 처리해주는 클래스를 선언할 수 있다.
- 엔티티에서 모델 클래스로 변환은 2가지 과정을 거친다.
- 모델 클래스 인스턴스화
- 렌더링 된 리소스의 링크 추가
- 과정
- Model 생성
- RepresentationModelAssemblerSupport 선언
RepresentationModelAssemblerSupport<엔티티 클래스, 모델 클래스>(url 매핑할 클래스, 매핑할 모델 클래스)toModel(): 엔티티로 모델을 생성하는 과정을 작성한다.instantiateModel(): 모델 객체를 인스턴스화 할 때 사용한다. createModelWithId() 내에서 이를 호출한다.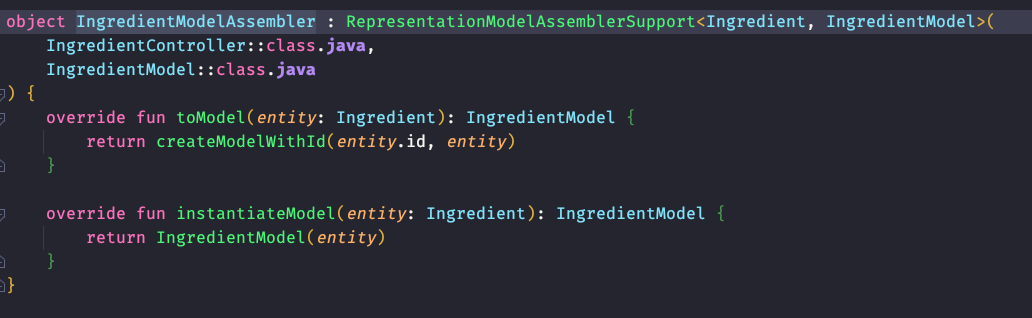
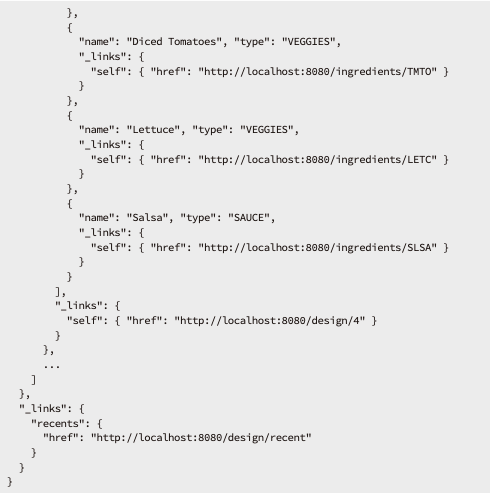
IngredientModelAssembler.toCollectionModel()를 통해서 리스트에 url 자동으로 매핑하기
- 결과: 각 ingredient 별로 url이 생성된것을 확인할 수 있다.
_embedded아래의 tacoModelList는 TacoModel 클래스명을 따라간.
{
    "_embedded": {
        "스List": [
            {
                "name": "tacoName",
                "createdAt": "2023-07-03T14:24:33.324+00:00",
                "ingredients": {
                    "_embedded": {
                        "ingredientModelList": [
                            {
                                "name": "Flour Tortilla",
                                "type": "WRAP",
                                "_links": {
                                    "self": {
                                        "href": "http://localhost:8080/ingredients/FLTO"
                                    }
                                }
                            },
                            {
                                "name": "Corn Tortilla",
                                "type": "WRAP",
                                "_links": {
                                    "self": {
                                        "href": "http://localhost:8080/ingredients/COTO"
                                    }
                                }
                            }
                        ]
                    }
                },
                "_links": {
                    "self": {
                        "href": "http://localhost:8080/design/1"
                    }
                }
            }
        ]
    },
    "_links": {
        "recents": {
            "href": "http://localhost:8080/design/recent"
        }
    }
}
embedded 관계 이름 짓기#
@Relation를 사용하면 스프링 HATEOAS가 JSON의 필드 일므을 짓는 방법을 지정할 수 있다.value: TacoModel이 객체로 매핑될 때 이름collectionRelation: CollectionModel에서 사용할 때 이름
@Relation(value = "taco", collectionRelation = "tacos")
class TacoModel private constructor(
   val name: String,
   val createdAt: Date,
   val ingredients: CollectionModel<IngredientModel>
): RepresentationModel<TacoModel>() {

   constructor(taco: Taco): this(taco.name, taco.createdAt, IngredientModelAssembler.toCollectionModel(taco.ingredients))
}
데이터 기반 서비스 활성화하기#
- 참고 자료
- 스프링 데이터 REST: 스프링 데이터가 생성하는 레포지토리의 REST API를 자동 생성한다.
- 의존성 추가
<dependency>
   <groupId>org.springframework.boot</groupId>
   <artifactId>spring-boot-starter-data-rest</artifactId>
</dependency>
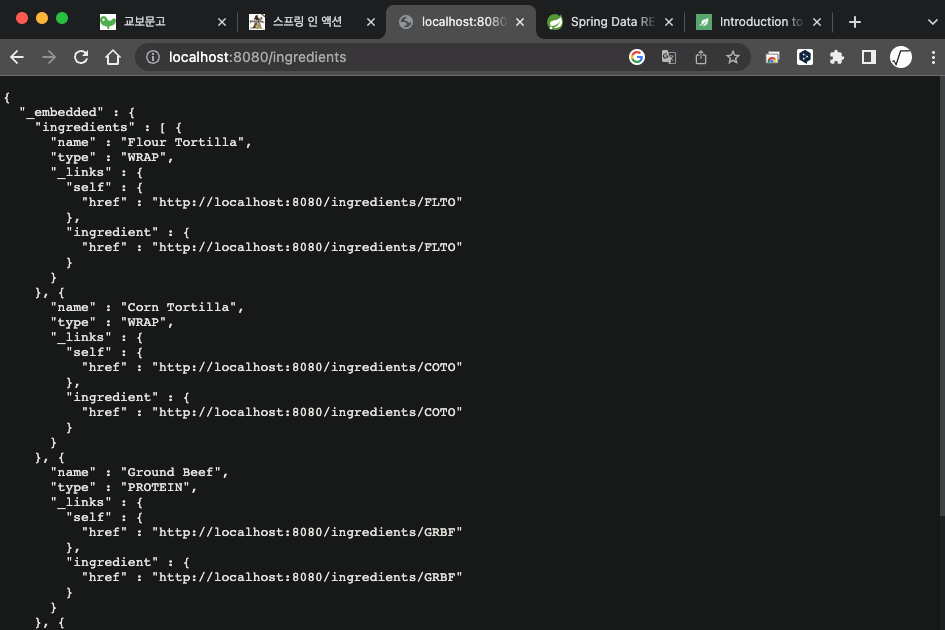
interface IngredientRepository : CrudRepository<Ingredient, String>
- 자동으로 REST API가 만들어진 것을 확인할 수 있다.
- HATEOAS도 적용된 모습을 볼 수 있다.
- 이 엔드포인트를 사용하려면 기존에 있던 컨트롤러와 겹치면 안된다.
- GET 뿐만아니라 POST, PUT, DELETE 메서드도 지원한다.
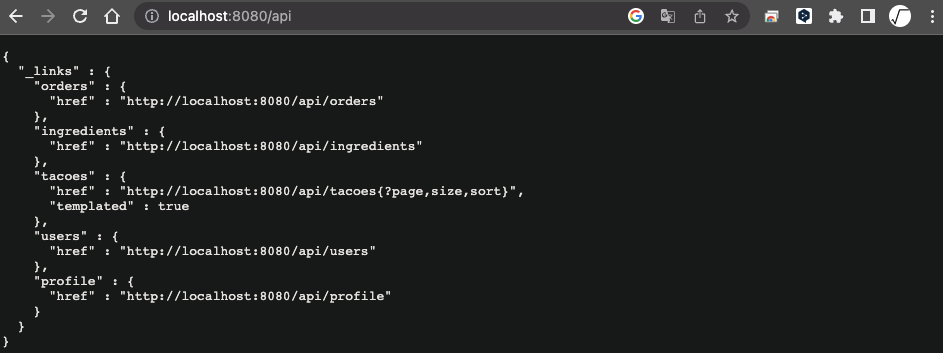
- Spring data rest가 생성한 API의 기본 경로를 설정할 수도 있다.
- 위 사진은 경로가
http://localhost:8080/api/ingredients로 변경될 것이다.
spring.data.rest.basePath=/api
- 홈 경로로 GET 요청을 하면, 스프링 데이터 REST를 통해 노출한 모든 엔드포인트를 확인할 수 있다.
리소스 경로와 관계 이름 조정하기#
- 엔티티에
@RestResource 애노테이션을 지정하면, 관계 이름과 경로를 커스텀 할 수 있다.
@RestResource(rel="tacos", path="tacos")
@Entity
class Taco(
// ...
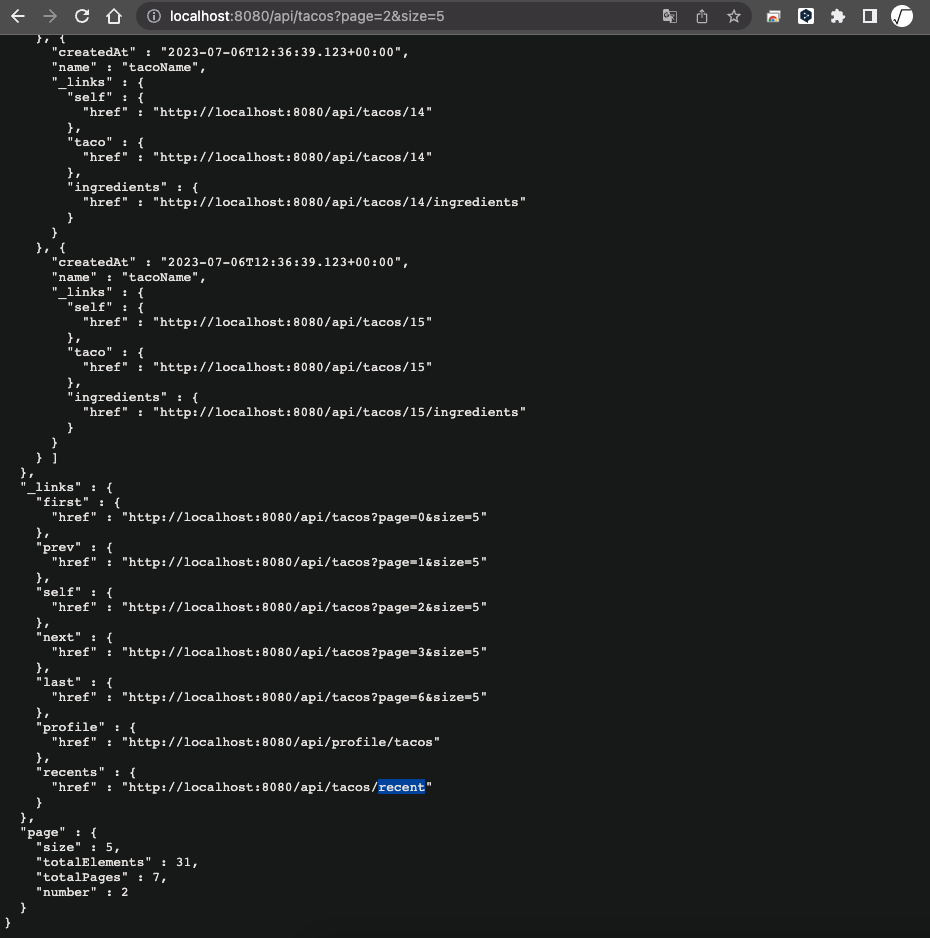
페이징과 정렬#
PagingAndSortingRepository<T, ID> 클래스를 상속하면 자동으로 REST API에서 페이지네이션을 지원한다.- HATEOAS를 통해 처음(first), 마지막(last), 다음(next), 이전(prev) 페이지의 링크를 제공한다.
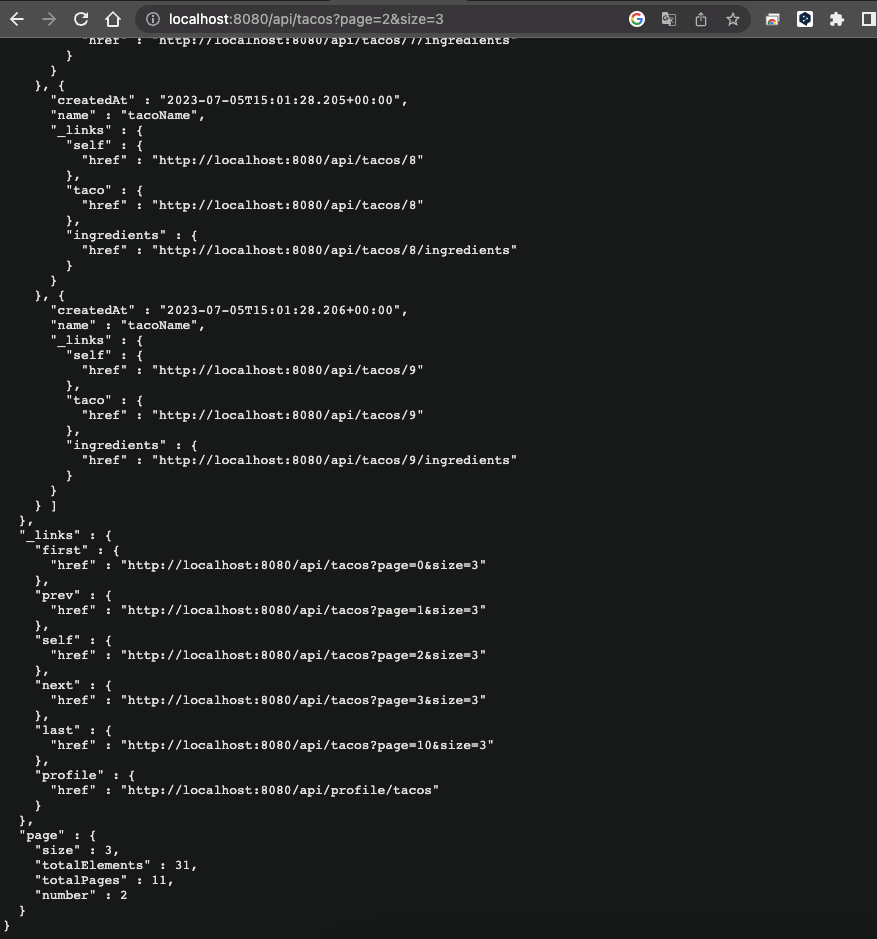
- sort 매개변수를 지정해서 정렬을 할 수도 있다.
- 내림차순 정렬도 가능하다
localhost:8080/api/tacos?sort=createdAt,desc&page=0&page=12
커스텀 엔드포인트 추가하기#
- 컨트롤러에 직접 정의한 REST API를 Spring data rest의 엔드포인트에 추가하고 싶은 경우가 있다.
@RepositoryRestController 애노테이션을 붙인 컨트롤러의 모든 경로 매핑은 Spring data rest의 base 경로가 앞에 붙는다.@RepositoryRestController는 @RestController와 다르게 반환값을 자동으로 응답 body에 수록하지 않는다.@ResponseBody 애노테이션을 지정하거나 ResponseEntity를 반환해야 된다.
@RepositoryRestController
class RecentTacosController(
   private val tacoRepository: TacoRepository
) {

   @GetMapping("/tacos/recent", produces = ["application/hal+json"])
   fun recentTacos(): ResponseEntity<CollectionModel<TacoModel>> {
      val pageRequest = PageRequest.of(0, 12, Sort.by("createdAt").descending())
      val tacos = tacoRepository.findAll(pageRequest)
         .content
      val tacoModels = TacoModelAssembler.toCollectionModel(tacos)

      val link =
         linkTo(methodOn(RecentTacosController::class.javaObjectType).recentTacos()).withRel("recents")
      tacoModels.add(link)
      return ResponseEntity(tacoModels, HttpStatus.OK)
   }
}
커스텀 하이퍼링크를 스프링 데이터 엔드포인트에 추가하기#
@RepresentationModelProcessor<T>를 빈으로 등록하면 자동으로 Spring Data REST의 엔드포인트로 추가된다.- T에는 엔드포인트를 추가하려고 하는 타입을 설정하면 된다.
- 아래 예시에서는 페이지네이션 적용된 타코 응답에 ‘recents’를 추가하는 것이다.
@Component
class TacoModelProcessor(
   private val links: EntityLinks
) : RepresentationModelProcessor<PagedModel<EntityModel<Taco>>> {

   override fun process(model: PagedModel<EntityModel<Taco>>): PagedModel<EntityModel<Taco>> {
      model.add(
         links.linkFor(Taco::class.java)
            .slash("recent")
            .withRel("recents")
      )
      return model
   }
}